
On the Song Track screen, right click and choose 'Riff Editor'. You can then move left and right to decide how long you want your riff to be - from 1 to 8 bars. You can also decide how many channels you want your riff to use - this is determined by how many vertical bars are selected when you first select Riff Editor (for example a 4-bar riff with 3 channels equates to a 4x3 rectangle of bars). For most tunes and bass-lines you will only need one, but if you want two notes to play at the same time, you will need to use two channels, and so on. The maximum number of channels you can use in one riff is 12.
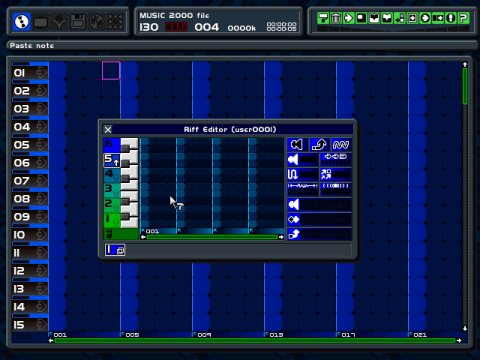
Once you are happy with the size of your riff, you will enter the riff editor screen - this isn't as complicated as it may look!
On the left hand side are the numbers 1 to 6, representing octaves on a keyboard. The current octave is highlighted. Next to these numbers are a representation of the keys of a piano. It is essentially a piano on its side, six octaves long. In a similar way to the standard song track screen, time goes from left to right. Don't worry about the icons on the right hand side of the screen for now - they provide advanced effects you won't need to use at the moment.
At the bottom of the screen are the channel numbers. Most of the time, you will only use one channel, but if you are making more complicated multi-channel riffs, the
currently selected channel will be highlighted.
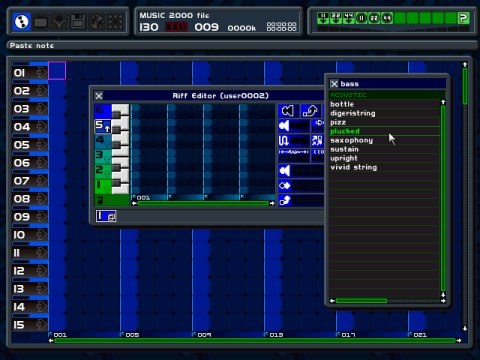
There are a vast number of different instruments you can choose from. Right click and choose 'Sample library'. This works in a very similar way to the riff library. Scroll left and right to change the type of sample and up and down to see all the samples within a particular section. Pressing F1 or right clicking demos a sample, and once you are happy with a sound, you can choose to load a sample at one of three different rates. A sample rate affects the quality of the sample - 11 kHz is the lowest quality, and 44 kHz is the highest quality. It's best to use 44kHz throughout your songs but in the unlikely event of your PC running out of memory, you can load in samples recorded at a lower rate.
Once you have chosen a sample, you will be shown a list of all the samples you currently have loaded in. If you have used any standard riffs in your song, the samples used will be in here already. Choose a blank slot for your sample, and left click. Note that you can replace a loaded sample with the new sample you have just chosen.
There are two ways to record a riff: step-time and real-time.
Step-time record
In step-time, you place the notes wherever you like by left clicking and then press Space to hear the riff. Move up and down to alter the pitch of the sample. If you move up past the highest note of the keyboard and return to your original position at the bottom you have risen a whole octave. Similarly, moving down when you are at the bottom of the riff will lower the octave. Moving left and right alters the timing of the note.
The lighter colored squares show each beat of each bar (there are four beats in a bar). The best way to understand step-time recording is to place a few notes in different places, move to the left hand side, and play the riff. If you make a mistake, you can press Delete to delete a note. Dragging and clicking makes the note hold for a longer amount of time.
Real-time record
If you would rather use your own rhythm to tap the notes in, choose 'Real-time recording' from the menu. You will hear a metronome clicking the beat. Move up and down to alter the pitch of a note, and then left click at the right time to enter a note there. If you make a mistake, you can press Delete.
You can also use a Midi keyboard to input notes in real-time record mode, or hone your skills in 'Real-time Practice' mode.

For each note, you can alter any of the note parameters. A word of caution - these are not for beginners. Don't think about using these until you are confident with the riff editor. You can enter the note parameters section by selecting any of the 'Note Parameters' from the right hand side of the Riff Editor while highlighting the note you wish to edit.
Note muting
You can use this to mute (silence) a note. When the icon is red, the note has been muted.
Note pitch-bend
This applies pitch-bend between two notes.
AM Channel (Low Frequency Oscillator)
This is a more advanced effect. When you choose this, a new channel will be created. Anything you place into this new channel will not be played as normal. Instead, the volume of whatever is placed in the new channel will directly alter the pitch of whatever is placed in the current channel. Try it and see!
Note volume
This allows you to alter the volume of the note.
Note repeat
This allows you to repeat a note very quickly, allowing you eight subdivisions within one of the blocks. Move left and right to change the subdivision, and move up and down to alter the status. A yellow block means that the note will play with reverb, a red block means the note will play without reverb, and a black block means that the note won't play at all.
Note vibrato
There are two settings for the vibrato of a note (the wobbling in pitch of a note). The first is the vibrato depth, and the second is the vibrato speed. These control respectively the amount and the speed of the wobble.
Note sample start
This controls the point where a sample starts playing from. For example, if you have a vocal sample that says 'coming soon', you can alter the start point so that the
sample just says 'soon'. Using this can create some fantastic new effects from existing samples.
Note effect
There are a large number of different effects that you can use on a note to make it sound a little different. Choose the effect you want from this menu. The best way to understand the difference between the effects is to try them all. If you don't want an effect, choose 'None'.
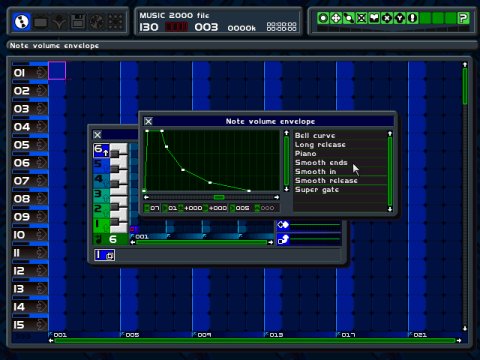
Note volume envelope
This lets you alter the volume envelope of a sample. On the graph, time goes from left to right, and the vertical scale is the volume. Therefore, you could make the sound start really loud and then tail off, or start quietly and then get louder. Use the menu to choose from a number of default envelope shapes, or click and drag to alter the position of any of the points. You can also add and delete points from the graph, again using the menu. As with all of the parameters, any changes you make will be saved with your song.
Note pan envelope
This allows you to alter the stereo position of a sample. Time goes from left to right on the graph and the stereo position runs vertically. Again, you can use the menu to choose from a number of default settings, or else create your own.
Note pitch envelope
The final parameter allows you to alter the pitch envelope of the sample. Time goes from left to right and the pitch runs vertically. Again, there are a number of default settings for you to try out.

As mentioned earlier, riffs can consist of several channels. Each channel can have one sample playing at a time, so if you want to create a riff with three samples playing simultaneously, you will need to make a three-channel riff. Click on the channel numbers at the bottom of the Riff Editor to toggle through the different channels. The notes in the current channel will be displayed brightly, and other notes from other channels will be dimmed out. This makes it easy to make complicated chords.
Using the menu within the riff-editor, you can alter the name and icon for your riff. These options are self-explanatory.
Any riff you create will automatically be stored in the riff palette. This makes it easy for you to quickly find any of the current riffs you have created.
Using the song track menu, you can choose to resize the riff. This will allow you to shrink or expand the riff. Click and drag until you are happy with the new size. Note that if you shrink a riff, you will lose any notes that are removed during this process. You can also 'clone' a riff. This allows you to alter one riff without changing all the other identical riffs in your song. Move over the riff, go into the menu and select 'Clone riff'. You can now alter this riff without changing any other identical riffs.
Simply click on the number of the channel to mute (silence) the whole channel. This can be useful when you want to hear a song without a particular channel playing. Changing the mute status again turns the channel back on.
You can split a riff into separate riffs. Move over the riff you want to split up, and select 'Split riff' from the menu. Once you have split a riff up, you can recombine any parts you want to by selecting them and using the 'join riffs' command